
With the rising awareness of sustainable energy solutions, more homeowners are considering solar panels to reduce energy bills and carbon footprints. Solar energy is not only beneficial for the environment but also offers potential savings on electricity costs. Installing solar panels is a significant investment, and understanding the process is crucial. This guide outlines the essential steps for solar panel installation, ensuring you make informed decisions and achieve the best results for your home.
Understanding the Basics of Solar Panel Installation
Before diving into the installation process, it’s important to understand what solar panel installation entails. Solar panels convert sunlight into electricity, which can power your home and reduce dependency on the grid. By harnessing renewable energy, homeowners can enjoy a more sustainable and cost-effective energy solution. Here’s a breakdown of what you should know.
Components of a Solar Electric System
A solar electric system consists of several key components:
- Solar Panels: These capture sunlight and convert it into electricity. Different types of panels, such as monocrystalline, polycrystalline, and thin-film, offer varying efficiencies and price points.
- Inverter: This device converts the direct current (DC) generated by the panels into alternating current (AC) used by most home appliances. It’s essential to choose an inverter that matches your system’s size and energy needs.
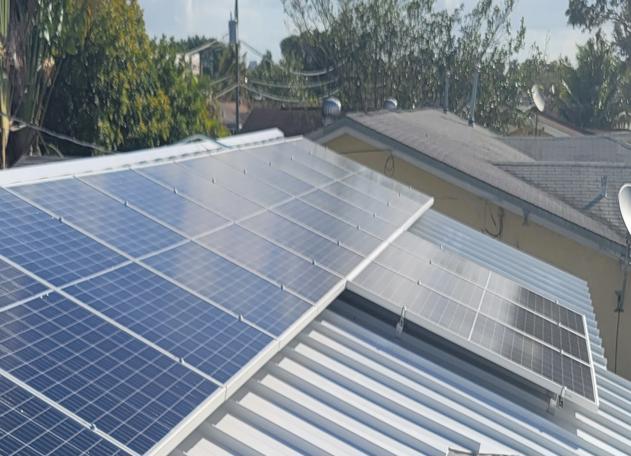
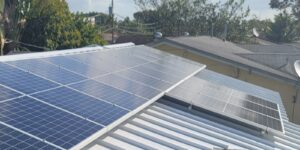
- Mounting System: This is used to secure the panels to your roof. Roof-mounted systems are common, but ground-mounted systems are an option if roof space is limited.
- Batteries (optional): These store excess energy for use when sunlight is not available, providing energy security and independence from the grid.
- Monitoring System: This tracks the performance of your solar power system, allowing you to ensure that it operates efficiently and detect any issues promptly.
Understanding these components helps you communicate effectively with your solar installation contractor and make informed choices. Familiarity with these elements also aids in troubleshooting and ensures you can maximize the benefits of your solar investment.
Step 1: Assessing Your Energy Needs
The first step in installing solar panels is determining your energy requirements. Analyze your utility bills to understand your average monthly consumption. This information is vital when deciding the size of the solar system you need. Having a clear picture of your energy usage will guide you in selecting an appropriate system that meets your household’s demands.
Calculating System Size
The size of your solar system depends on:
- Your average energy usage: Review past electricity bills to calculate your average monthly and annual consumption. This will help determine the number of panels you need.
- The available roof space: The amount of usable roof area dictates how many panels can be installed. Consider any obstacles that may limit installation space, such as chimneys or vents.
- The efficiency of the solar panels you choose: Higher efficiency panels generate more electricity per square foot, which can be beneficial if roof space is limited.
Consulting with a solar installation contractor can provide a more accurate assessment tailored to your specific needs. They can offer insights on optimizing system size and layout to suit your property’s characteristics.
Step 2: Evaluating Your Roof Condition
Not every roof is suitable for solar panel installation. Your roof should be in good condition and have a suitable pitch and orientation to maximize sun exposure. The ideal roof will face south in the northern hemisphere, ensuring maximum sunlight capture throughout the day.
Roof Inspection
Before installation, have a professional inspect your roof for:
- Structural integrity: Ensure your roof can support the additional weight of the solar panels. Weak or damaged areas may require reinforcement or repair.
- Shading from trees or other buildings: Identify any potential sources of shade that could impact solar panel performance. Trimming trees or choosing a different installation site may be necessary.
- Roof angle and orientation: The angle and direction of your roof affect solar efficiency. A roof with a pitch between 15 and 40 degrees is typically ideal.
If your roof needs repairs, address these before proceeding with the solar panel installation. A well-prepared roof ensures the longevity and efficiency of your solar system.
Step 3: Understanding Costs and Financing Options

The cost of solar panel installation can vary significantly based on several factors, including location, system size, and the solar installation company you choose. Understanding these costs can help you budget effectively and explore ways to reduce expenses.
Breaking Down the Costs
- Equipment Costs: This includes the cost of solar panels, inverters, and other components. Prices can vary based on the technology and brand you choose.
- Installation Costs: Labor and permits can add to the overall cost. Installation complexity and local regulations can influence pricing.
- Additional Expenses: These might include maintenance and battery storage if you opt for it. Consider the long-term savings these components can offer.
Financing Options
Explore various financing options to make solar installation affordable:
- Cash Purchase: Paying upfront maximizes long-term savings, allowing you to avoid interest payments and benefit from immediate energy savings.
- Solar Loans: These allow you to pay over time, making solar more accessible to those who cannot afford the upfront cost.
- Leases and Power Purchase Agreements (PPAs): You can lease the system or pay for the power generated, offering lower initial costs and flexible payment plans.
Research incentives and tax credits available in your area, which can significantly reduce the cost of solar panel installation. Many governments offer financial incentives to encourage renewable energy adoption, providing opportunities for additional savings.
Step 4: Selecting a Solar Installation Contractor

Choosing the right solar installation contractor is crucial for a successful installation. A reputable contractor will ensure quality workmanship and guide you through the installation process with expertise and transparency. Here are some tips to guide you:
What to Look For
- Experience: Ensure the contractor has experience with residential solar installations. An experienced contractor will have a proven track record and the ability to address any challenges that arise.
- Reputation: Check reviews and ask for references. Customer feedback and testimonials can provide insight into a contractor’s reliability and service quality.
- Certifications: Look for certifications such as NABCEP (North American Board of Certified Energy Practitioners). Certified professionals are held to high industry standards.
- Warranties: Understand the warranties offered on both the equipment and installation. Comprehensive warranties provide peace of mind and protection for your investment.
Meeting with multiple contractors can help you compare quotes and services, ensuring you get the best value. Thoroughly vetting potential contractors reduces the risk of complications during and after installation.
Step 5: Installation Process
Once you’ve selected a contractor, the installation process begins, typically taking one to three days, depending on the system’s size and complexity. The contractor will outline a timeline and keep you informed of each phase of the project.
Installation Steps

- Permits and Paperwork: Your contractor will handle the necessary permits and paperwork. This step ensures compliance with local regulations and safety standards.
- Mounting the Panels: The mounting system is installed first, followed by the solar panels. Proper installation is critical to ensure durability and optimal performance.
- Electrical Wiring: This connects the panels to your inverter and electrical panel. Qualified electricians ensure safe and efficient wiring.
- System Inspection: A thorough inspection ensures everything is installed correctly and safely. Inspectors verify that the system meets all regulatory requirements.
- Connecting to the Grid: Finally, the system is connected to the grid, and you can start generating solar power. The utility company may need to approve the connection before the system goes live.
Step 6: Post-Installation Maintenance
Solar panels require minimal maintenance. However, regular checks can ensure optimal performance and extend the lifespan of your system. Proactive maintenance helps identify and resolve issues before they impact energy generation.
Maintenance Tips
- Clean Panels: Dust and debris can reduce efficiency, so clean your panels periodically. Use water and a soft brush to prevent damage to the panels’ surface.
- Monitor Performance: Use the monitoring system to track the system’s performance and address any issues promptly. Sudden drops in efficiency may indicate a problem that needs investigation.
- Schedule Inspections: Have a professional inspect the system annually to ensure everything is functioning correctly. Regular inspections can catch minor issues before they become significant problems.
Conclusion
Installing solar panels is a significant investment that can offer substantial benefits in the long run. By following these essential steps, you can ensure a smooth installation process and maximize your solar energy system’s efficiency. Whether you’re concerned about solar panel installation costs or selecting the right solar installation company, being informed is key to making the best decisions for your home and the environment. Embracing solar energy not only contributes to a sustainable future but also enhances the value and energy independence of your property.


